Thursday, November 14, 2019

Building a Compound Pulley

We continued our exploration of pulleys by building our own compound pulleys out of two paper clips, a piece of string, a piece of tape, and a weight. The compound pulley is where a fixed pulley is attached to something, and the second pulley is moveable and is attached to the fixed pulley. You would use two pulleys to lift something because having two pulleys makes it easier (half as hard!). BUT by having more pulleys, there is more rope, and you have to pull more times.

"It was hard making the fixed pulley stay without falling." ~ Charlotte
"You couldn't have a heavy weight because if it was very heavy it would fall off easily." ~ Sophia
"I found it a little tricky because when me and Jaxton were working, we didn't really understand how to make our pulley. Jasper was beside us with his partner. They made one that was in the show we watched that had five and they kept adding on to it." ~ Owen
"When I told my partner, let's use the big, heavy weight, I put it on the paper clip and the whole pulley fell apart. Then I used a smaller weight that was 50 g and it worked a lot better." ~ Desiree

"When we were making our pulley, we were able to make the first one easily but then for the compound pulley, we had no idea what to do because it looked pretty complicated. Ms Elder helped us and it was not as hard as it seemed." ~ Abigail
"It may look hard but it's actually pretty easy once you get the hang of it." ~ D
"The hint I would give people is that there has to be one fixed pulley at the top." ~ Priya
"A hint I would give someone is to attach the fixed pulley to the moveable pulley." ~ Silas
"You have to have one pulley attached to the weight." ~ Sophia


"My tip would be to have one straight line (of string) down and then it loops back around to the other pulley." ~ Owen
"I found that when I was making a compound pulley, I went overboard with the number of pulleys I was putting on it. It got way too confusing and it started to not work because the string got tangled." ~ Jasper
"When I was putting the rope onto the pulley, I thought you were supposed to tie it to the moveable pulley but I tried and it didn't work when I pulled the rope. So then I tried and didn't tie it and hooked it under and I only tied the fixed pulley and it worked." ~ Desiree
"My tip would be to make the moveable pulley then thread the needle." ~ Abigail
"Now I understand how to make the fixed pulley because Ms. Elder showed me how by giving me a hint putting the rope like a circle to make it work." ~ James
"Once you make a compound pulley, you have to make sure it isn't tangled when you try it out." ~ Sophia
"I saw Sophia's when she figured it out so then I understood it more. So then I tried it myself and it was easy." ~ Priya

Wednesday, November 13, 2019

Simple Machines: Building with Pulleys

To continue our exploration of Simple Machines, today we watched this video (click here) and tried out building a pulley.

Here are some student reflections on the activity:


"We're using the pulley to lift the load (the weight) up. The spring scale measures how hard it is to lift it." ~ Nikita


"We're pulling down on the rope which makes the load go up. It's easier because you don't have to carry it up a ladder or stairs." ~ Charlotte


"This is a three pulley system. It makes the job easier. It was difficult to make because it kept falling a part." ~ Abigail and Ina

Tuesday, November 12, 2019

Public Art Piece Gallery Walk

On Thursday, we celebrated the creation of our own public art pieces. We each put our artwork on our desks with our artist's note, then we walked around the gallery to view each other's work. We each had one person who we needed to give written feedback to.

Today, we will take home our marks and peer feedback forms.

Below are some student comments from the project. You can see that we all learned a lot from the process. Working with clay (the medium most people chose) was harder than we expected.

Giving peer feedback.


"I saw that everybody had a unique art piece and worked really hard to make it. I thought all of them were amazing." ~ Sophia
"I didn't exactly like studying public art pieces but it was fun to make them. I like to build things because it's art." ~ Abigail
"I've learned that some people who did a plan added extra things and then when they found out that it broke they had to go to a plan B." ~ Bianca
"I find that everybody that put toothpicks, popsicle sticks in their clay, they all fell out and broke. Also people that had really dry clay, fell apart." ~ Priya


"I learned that everybody struggled and everybody chose different art pieces to show that everyone's different. Art can do a lot to people." ~ Jaxton
"We worked really hard and it took us a long time. Sometimes we thought through our art and we didn't like it so we had to restart and it worked out in the end." ~ Desiree
"This was a project that took us through stress and building something, and having it fall apart, and having to rebuilt it, and getting really mad at it, and after a while, when I was using popsicle sticks to make my art stand out, they collapsed. Then I decided that it doesn't have to have popsicle sticks so I moved on from there and it is the way it is. Sometimes life isn't how you planned it." ~ Owen

Friday, November 8, 2019

Learning Conferences

Student Learning Conferences will take place on Thursday, November 21 from 4-7pm and Friday, November 22 from 8am-1pm.

Please follow the link below to book a conference. If you have any difficulties, please call the school and Ms Calhoun can assist you.

I have asked students to come to their conference. They will have some work to share and we will set a goal together.

Please contact me if you have any questions,
Ms Elder

Building a Catapult

We are studying Simple Machines. Today we built catapults, which are levers.
First, we watched these two videos: Catapults are Levers and Two Ways to Build Your Own Catapult. We got to decide if we wanted to work alone or with a partner, and whether we wanted to try making the basic design or the more complex design. Then, we got building! Testing after we built was the most fun part...Ms Elder gave us cups for target practice!


Here are some thoughts after building:

"Catapults are a simple machine: a lever." ~ Ina
"I think we did this activity because it relates to simple machines. It also relates to how hard it is to pull something down to make something fly upwards." ~ Owen
"I found out that the further you put the fulcrum to the load, the further it flies." ~ Nikita
"I learned that simple machines may look simple to build but really some of them are very difficult." ~ Abigail
"I think we did this activity because we're building an amusement park ride. Maybe it has something to do with that." ~ Bianca
"I think we did this activity because we have different thoughts on what to build, different thoughts on how to do it, and to show how everyone is different." ~ Jaxton
"I enjoyed how we got to experiment. There were two different ways you could build the catapult so we got to choose our design." ~ Sophia

Wednesday, November 6, 2019

Remembrance Day

Our Remembrance Day Assembly will be this Friday at 10:30 am. Families are welcome to join.

Here is the work our class will be sharing:


Our class has been learning about Canada’s history. We discovered that Canada was a fairly new country when World War One started in 1914.

At that time, Canada only had a population of 8 million people. During World War One, 61 000 Canadian soldiers lost their lives in battle.

Context helps us understand information.
To help us understand how many people that was, we found the percentage of the population who died.

It turned out that that was 1% of Canada’s population in 1914. One in one hundred Canadians lost their life in the war. That’s very significant. We represented this information in a pie chart.

Next, we learned about Canada gaining its independence from Britain and having the right to choose in 1939 to join World War Two.

Shortly after, in 1956, Lester Pearson started an organization called The Canadian Peacekeepers. Our Peacekeepers went into battle areas to protect human rights and provide aid like food, clean water, and medicine. Currently we have peacekeepers in Mali, Africa.

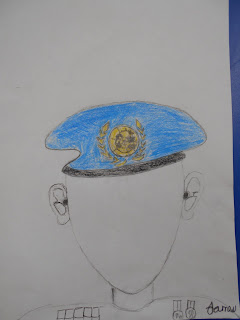
The blue beret became a symbol around the world of Canada’s mission to make peace. We’re proud to be Canadian and for the efforts of our peacekeepers.

To honour our Canadian peacekeepers, we decided to use the portrait skills we’ve developed this year to create an exhibit called Portraits of Peace. Each student in our class got to choose the form of art they wanted, and we each created a portrait of a peacekeeper. We tried to represent different groups of people through various skin colours, ages, hair colours, and more to celebrate our differences.

You can find examples of our work in the hallway outside the Library.


Monday, November 4, 2019

"Wheelie" experiment

Here, we're gluing the wheels on to the axel
As a part of our Simple Machines unit, today we create a wheel and axel with a toilet paper roll and two circles cut from cereal boxes. We got to choose what type of experiment we did (to test a theory). For example, some students tried to make the wheelie goes as far as it could, or people changed the location of the axel to see how that would affect the way it moved. Some students chose to use bigger wheels, and some used smaller wheels.

Here were our steps:


Why we did this experiment:
"To see what type of wheels would go farther than other types of wheels." ~ Owen
"To experiment how we make toys and how if it's heavier or lighter will make it faster." ~ Sophia
"We've been learning about Simple Machines and this is a type of simple machine." ~ Priya
"For problem-solving." ~ K

"This was my original design of a wheel and axel." ~ Jaxton


What we learned
:
"I learned that the bigger the wheel, the less friction it makes, so the faster it goes." ~ Nikita
"I found extra pieces of cardboard. I made an extra air pocket to catch the air. I learned that it will slow the wheel and axel down." ~ Owen
"I figured out that when you attach more wheels, it stabilizes it. As it goes down the incline plane, it slows it down which makes it roll straighter, and helps it go farther." ~ Jaxton

This is where we tested our wheelies down the ramp/incline plane. 


How to View our Google Classroom

Hi Everyone, One last quick note from me: As per instructions, I have "Archived" our Google Classroom. You are still able to v...